Applying CI/CD Using GitHub Actions for Android
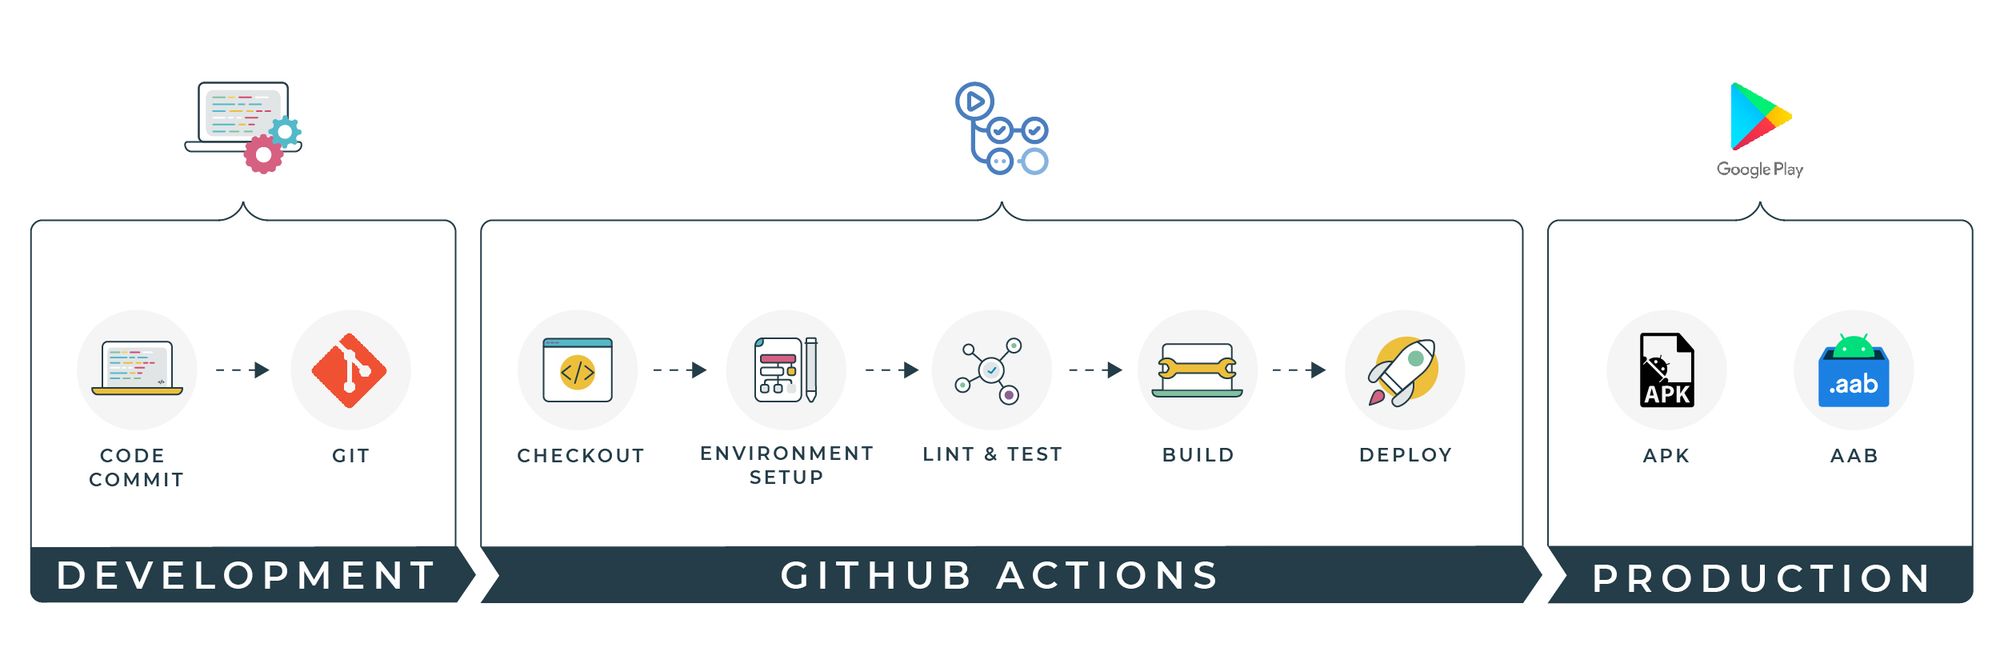
All developers know how crucial it is to ensure that their programs and products are up and running, and that includes the Interface X Apps Team here at Empathy.co. Since Continuous Integration/Continuous Delivery is such an essential part of keeping your code in peak form, we wanted to share the process we follow when working with GitHub Actions for Android. The team values the high degree of customisation that can be achieved using GitHub Actions during CI/CD implementation, while also providing the flexibility to choose from ready-made actions or to create them from scratch.
Step 1: Google Play Developer API
The official documentation explains all the steps in detail. Here’s a summary:
- Go to the Google Play Developer Console as the account owner and open the API access section
- Accept the Terms of Service
- Create a new Google Cloud project, if you haven’t already (otherwise, link an existing one)
- Once you have completed the necessary steps in Google Cloud Platform, you can go back to the Google Play Developer Console (to the API access section)
- The newly created account should appear under
Service accounts. Click onGrant accessand add all the apps you want to manage with this service account.
Step 2: Enable Play App Signing
Follow the steps in the official documentation to enrol the app in Play App Signing.
Step 3: Create service_account.json
You need a service account JSON file from the Google Play Store to upload the artifact. Follow the steps in the official documentation.
Step 4: Gradle Build
There are several GitHub Actions to sign an Android .apk or .aab file for release (e.g., r0adkll/sign-android-release), but the Interface X Apps Team at Empathy.co prefers to have this configuration in Gradle, as it provides the option to build signed releases in local and reduce coupling with the CI system (configuration in Gradle will work with GitHub Actions, Jenkins, etc).
The Gradle build needs to be configured to include a signing configuration that reads the secrets from environment variables (or the ~/.gradle/gradle.properties file).
For local builds, the location of the keystore, the keystore password, the signing key alias and the signing key password will be configured using the ~/.gradle/gradle.properties file. If you don’t have that file, create one and add these lines:
KEYSTORE_FILE=/your_path_to/playstore.keystore.jks
KEYSTORE_PASSWORD=your_keystore_password
SIGNING_KEY_ALIAS=your_signing_key_alias
SIGNING_KEY_PASSWORD=your_signing_key_passwordCreate a signing config in your app’s gradle.build.kts file:
signingConfigs {
    create("release") {
        storeFile = file(project.property("KEYSTORE_FILE").toString())
        storePassword = project.property("KEYSTORE_PASSWORD").toString()
        keyAlias = project.property("SIGNING_KEY_ALIAS").toString()
        keyPassword = project.property("SIGNING_KEY_PASSWORD").toString()
    }
}Note: If you use environment variables instead of the gradle.properties file, you can retrieve values using System.getenv, for example:
storePassword = System.getenv("KEYSTORE_PASSWORD")Add the signing config to the build type:
buildTypes {
    getByName("debug") {
        // your configuration here
        signingConfig = signingConfigs.getByName(name)
    }

    getByName("release") {
        // your configuration here
        signingConfig = signingConfigs.getByName(name)
    }
}
Then, you can check your local configuration by running the following command:
./gradlew bundleIf the signing configuration is correct, it creates one or more .aab files in the build/outputs/bundle folder.
Step 5: GitHub Action
GitHub Actions requires a .yml file specifying all the steps for the CI/CD. The files are stored in the folder .github/workflows/your_workflow.yml. For more on GitHub workflow actions, check out the official documentation.
Repository Secrets
First, you need to configure the secrets passed to the Gradle build as parameters:
- KEYSTORE_FILE
- KEYSTORE_PASSWORD
- SIGNING_KEY_ALIAS
- SIGNING_KEY_PASSWORD
- SERVICE_ACCOUNT_JSON
KEYSTORE_PASSWORD, SIGNING_KEY_ALIAS and SIGNING_KEY_PASSWORD are just text values, so you can enter the three variables with correct values directly. Check out the official documentation to learn more.
To store the KEYSTORE_FILE as a repository secret, base64 encode the files. The build pipeline will decode it and recreate the original file.
Run the following command to encode the file:
openssl base64 < playstore.keystore.jks | tr -d '\n' | tee keystore_base64_encoded.txtCopy the base64 string in the file and create the repository secret in GitHub.
You also need to copy all the contents in the service_account.json file and create a repository secret in GitHub.
Create Folders and YML File
- In the root folder of your project, create a
.githubfolder - Then, create another folder inside it called
workflows - Inside the
workflowsfolder, create arelease_app.ymlfile
Action Name and Triggers
# Workflow name
name: Release App

# When it will be triggered
on:
  push:
    branches:
      - main

# Where it will run
jobs:
  build:
runs-on: ubuntu-latestSetting Up Your Android App
Initially, you have to set up your environment and, in order to do that, you need to check out your code and set up the JDK and Android SDK.
- name: Fetch Sources
  uses: actions/checkout@v2
  with:
    # Number of commits to fetch. 0 indicates all history for all branches and tags.
    fetch-depth: 0

- name: Setup JDK
  uses: actions/setup-java@v2
  with:
    distribution: 'zulu'
    java-version: '11'

- name: Setup Android SDK
uses: android-actions/setup-android@v2Setting Up Gradle Cache
Downloading dependencies for Android projects is a time consuming task. For that reason, you can cache them using the cache action and update it only when either the dependencies class or a Gradle file has been changed. This example assumes that your dependencies are defined in a buildSrc file with Kotlin DSL:
# Cache Gradle dependencies and Gradle Wrapper
- name: Setup Gradle Cache
  uses: actions/cache@v2
  with:
    path: |
      ~/.gradle/caches
      ~/.gradle/wrapper
    key: ${{ runner.os }}-${{ hashFiles('**/*.gradle*') }}-${{ hashFiles('**/gradle/wrapper/gradle-wrapper.properties') }}-${{ hashFiles('**/buildSrc/**/*.kt') }}

- name: Make gradlew executable
run: chmod +x ./gradlewSetting Up Version Code and Version Name
You need to increment version code for every release. You can do this using some bash commands and timestamps, or by using some GitHub properties. At Empathy.co, we choose to build our version codes and version names with the following:
- Version code:
github.run_numberis a unique number for each run of a particular workflow in a repository. - Version name: uses the last tag and commit count as part of the release.
- name: Generate App Version Name
   run: echo "VERSION_NAME=$(git describe --tags | sed 's/\(.*\)-/\1./' | sed 's/\(.*\)-/\1+/')" >> $GITHUB_ENV

- name: Bump Version
  uses: chkfung/android-version-actions@v1.1
  with:
    gradlePath: app/build.gradle.kts
    versionCode: ${{ github.run_number }}
versionName: ${{ env.VERSION_NAME }}Testing and Linters
There are several tests and analysis tools you might want to run in the CI/CD environment. Luckily, with GitHub actions you can directly run Gradle commands.
You can use variants commands:
- name: Run Ktlint
  run: ./gradlew ktlintStagingDebugCheck

- name: Run Unit Tests
run: ./gradlew testStagingDebugUnitTestOr, you can choose to run a more complete command:
- name: Run Linters and Test
run: ./gradlew checkYou can also run Espresso Tests with GitHub Actions. There are several actions to trigger them (e.g., reactivecircus/android-emulator-runner).
What if tests are failing?
You can simply upload test reports using the upload-artifact action, to see which tests failed.
- name: Upload Reports
  uses: actions/upload-artifact@v2
  with:
    name: Test-Reports
    path: app/build/reports
if: always()if: always()`, which means that reports will be uploaded even though the tests step has failed. Check out the official documentation to learn more about status checks.Restore Keystore
The keystore file needs to be extracted from the secrets and written to a file since the Gradle build takes a file path/name as a parameter. There are several actions that can be used to do this (e.g., timheuer/base64-to-file), but if you prefer to do it directly, use this code snippet:
- name: Restore playstore.keystore.jks
  run: echo $KEYSTORE_FILE | base64 -d > /your_path_to/playstore.keystore.jks
Restore Signing Configuration
If you are using the gradle.properties approach, you can call Gradle with the right parameters, e.g.:
- name: Build Release AAB
  run: ./gradlew
    -PKEYSTORE_FILE="../${{ /your_path_to/playstore.keystore.jks }}"
    -PKEYSTORE_PASSWORD=${{ secrets.KEYSTORE_PASSWORD }}
    -PSIGNING_KEY_ALIAS=${{ secrets.SIGNING_KEY_ALIAS }}
    -PSIGNING_KEY_PASSWORD=${{ secrets.SIGNING_KEY_PASSWORD }}
app:bundleReleaseIf you prefer to restore the entire file, you can do so by using:
- name: Restore gradle.properties
  run: |
    mkdir -p ~/.gradle/
    echo "KEYSTORE_FILE=/your_path_to/playstore.keystore.jks" >> ~/.gradle/gradle.properties
    echo "KEYSTORE_PASSWORD=${{ secrets.KEYSTORE_PASSWORD }}" >> ~/.gradle/gradle.properties
    echo "SIGNING_KEY_ALIAS=${{ secrets.SIGNING_KEY_ALIAS }}" >> ~/.gradle/gradle.properties
    echo "SIGNING_KEY_PASSWORD=${{ secrets.SIGNING_KEY_PASSWORD }}" >> ~/.gradle/gradle.properties
shell: bashBuilding Artifacts
Android has the particularity of being able to generate several artifacts based on Flavor or BuildType. Depending on the team structure, some of them are more relevant than others. Again, Gradle commands can be called directly, in order to generate the number of artifacts that are relevant. Here is an example:
- name: Build Release AAB
run: ./gradlew app:bundleReleasePublish to Play Store
This action will upload an Android .apk or .aab file to the Google Play Store. In the event that you are setting up to upload only .aab files in the releases folder to the internal track:
- name: Deploy to Play Store
  uses: r0adkll/upload-google-play@v1
  with:
    serviceAccountJsonPlainText: ${{ secrets.SERVICE_ACCOUNT_JSON }}
    packageName: your.app.package
    releaseFiles: app/build/outputs/bundle/release/*.aab
    track: internal
What else can GitHub Actions do for Android projects?
What we’ve covered so far is a good starting point for building Android projects with GitHub Actions, but you can benefit from other interesting features.
Add Status Badge
We can add a GitHub status badge for a specific workflow. Explore the official documentation to learn more.
Validate the Gradle Wrapper
The Gradle Wrapper is a script that is utilized to interact with a Gradle project to ensure the correct Gradle version is being used. The script actually calls a gradle-wrapper.jar file, which sometimes gets updated when you update the Gradle verison.
This is a security vulnerability because the .jar is a binary file, so GitHub can’t show the differences when you update the Gradle version. The change could contain malicious code, so you need to be especially careful of this when working on open source projects.
Gradle has created the gradle/wrapper-validation-action to ensure the .jar file is valid.
name: "Gradle Wrapper Validation"

on:
  pull_request:
    branches:
      - main
  push:
    branches:
      - main

jobs:
  # Run Gradle Wrapper Validation Action to verify the Wrapper's checksum
  gradle-validation:
    name: Gradle Wrapper
    runs-on: [ self-hosted ]
    steps:

      # Checkout current repository
      - name: Fetch Sources
        uses: actions/checkout@v2

      # Validate Wrapper
      - name: Gradle Wrapper Validation
uses: gradle/wrapper-validation-action@v1Now, when your workflow runs, it validates the Gradle wrapper.
GitHub Release
If after publishing the app, you want to create a release in GitHub with the release number, changelog, and the artifact itself, the process is as follows. Each version and release should be unique, thereby employing the version name generated previously.
- name: Release
  id: create_release
  uses: actions/create-release@v1
  with:
    release_name: Release v.${{ env.VERSION_NAME }}
    draft: false
    prerelease: false
  env:
GITHUB_TOKEN: ${{ secrets.GITHUB_TOKEN }}Upload Release Assets
You can also upload the signed artifact as a release asset using actions/upload-release-asset.
- name: Release
  id: create_release
  uses: actions/create-release@v1
  with:
    release_name: Release v.${{ env.VERSION_NAME }}
    draft: false
    prerelease: false
  env:
GITHUB_TOKEN: ${{ secrets.GITHUB_TOKEN }}${{ steps.create_release.outputs.upload_url }}.Summary
GitHub Actions is a powerful tool to easily add CI/CD to Android projects. It is highly customisable, providing APIs to create actions as needed, as well as the option of accessing them from the GitHub marketplace. If your code is already in GitHub, that is a strong argument for using GitHub Actions. To benefit from a very valuable integration with your code, issues and release workflow, the Interface X Apps Team at Empathy.co recommends GitHub Actions. We hope you have a successful experience with it, and encourage you to reach out to us if you have any questions about the process, whatsoever!