ElasticSearch Data Migration in Kubernetes
Categories

Managing stateful applications in Kubernetes has a reputation for being difficult and tricky. Migrating data between different storage systems without downtime is usually a challenge. But it doesn’t have to be; there’s another way! Let’s take a look at the steps involved in a successful production maintenance window while migrating data from several ElasticSearch clusters running on Kubernetes.
The Starting Point
Here at Empathy.co, our Evolve enterprise customers run workloads on their preferred cloud provider, while our teams develop microservices and containerized applications that are then pushed to different image repositories. When it comes time for them to be used in the customer’s cloud, the Kubernetes cluster is able to pull those images and run the application. Empathy.co provides the microservices; our customers choose what fits their needs - from the cloud, to the Kubernetes infrastructure, to all the other frameworks involved.
When such a project begins, the goal is to have everything up-and-running as soon as possible, in order to reach production environments by the agreed-upon date. It is a balance between working quickly to meet the customer’s requirements and deadline, while ensuring effective implementation. Once that is done, next comes performance and operational cost optimization. Spoiler alert: Empathy.co does it all-in-one.
The Challenge
One of our customers running workloads in Google Cloud Platform has a Portworx license, which provides persistent storage for Kubernetes, but it is set to expire during the current year. We decided to avoid a potential disruption by crafting a solution. How, you ask? By planning, testing, and then replacing Portworx storage with regional persistent disks (RPD), over the past few months.
The plan needs the ElasticSearch clusters to be operational 100% of the time during the switch, so that there won’t be any downtime in the services using ElasticSearch.
To perform the change, planning the Kubernetes StatefulSet migration ahead of time is key. PVCs associated with StatefulSet need to use another StorageClass and Kubernetes StorageClass can't be migrated easily. Not to worry, we’ll lay everything out for you!
The Infra Diagram
In this case, our customer has a multi-region setup that is running in GCP. When viewed from a high level, the infra diagram for an ElasticSearch production environment appears as follows:
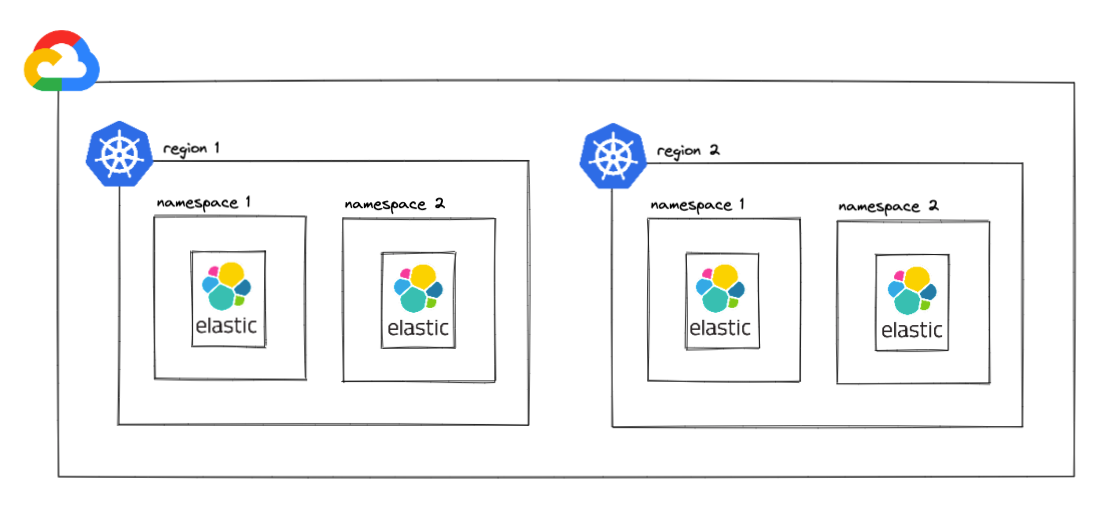
As seen in the image above, there are four different ElasticSearch clusters, two per region.
Below is an overview of what it looks like at ElasticSearch cluster level and how each cluster is built:
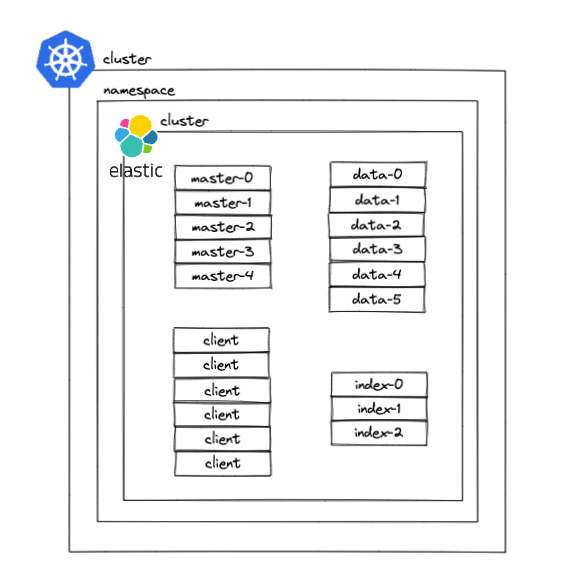
Several microservices use the client nodes to access ElasticSearch, whereas other services use index nodes to input the data into the cluster. The data nodes are those that store data in the cluster; master nodes manage the cluster configuration and status.
The Options
Now that we’ve clarified the infrastructure, it’s time to talk about persistent storage migration options.
Elasticdump
With Elasticdump, data can be copied between two different ElasticSearch clusters using the following steps:
- Create a new ElasticSearch cluster using RPD as StorageClass
- Stop index services to keep data unmodified during the copy process
- Deploy an Elasticdump pod in the cluster to replicate data between ElasticSearch clusters
kubectl run elasticdump --image=elasticdump/elasticsearch-dump -- --input=<OLD-CLUSTER> --output=<NEW_CLUSTER>
4. Once the copy has been completed, check that all the indices have the same status in both clusters and that all the documents are the same in both clusters.
5. Point the services to the new cluster and decommission the old cluster.
This process should be easy, as the copy remains inside the Kubernetes cluster. But, there are several cons to be aware of:
- Each index has a limit of total fields and can be exceeded easily. Some documents may not be copied.
- The process is slow – copying less than 3GB between clusters takes over an hour.
- If there is an error in the Elasticdump pod, the entire process has to be restarted.
Full Reindex
A full reindex can be performed into the new cluster, as follows:
- Create a new ElasticSearch cluster using RPD as StorageClass
- Stop index services to keep data unmodified during the process
- Start a full reindex on the new cluster
- Once the full index has been completed, point all the services to the new cluster and decommission the old cluster
The full reindexing process should also be quite straightforward. However, depending on the size of the index, performing a full reindex could take anywhere from several hours to more than a day.
Snapshot and Restore
This option includes the use of third party storage to save a snapshot and then restore that snapshot. The official Snapshot and Restore guide can be referenced for additional details, but the process to follow is:
- Create a new ElasticSearch cluster using RPD as StorageClass
- Stop index services to keep data unmodified during the process
- Start a snapshot process on the current ElasticSearch cluster
- Restore the snapshot to the new ElasticSearch cluster
- Once the restore has been completed, point all the services to the new cluster and decommission the old cluster
Existing data is kept safe and secure in this process, but is necessary to deploy the cluster with a plugin for the third party snapshot storage. Additionally, the creation of third-party storage is mandatory, options such as GCS or S3 are not always available.
Reindex API
The process performs a reindex API call to the ElasticSearch cluster to reindex all the indices, one by one. In order to do this:
- Create a new ElasticSearch cluster using RPD as StorageClass
- Stop index services to keep data unmodified during the process
- Perform a reindex API call for each index
- Once all the indices have been reindexed, point all the services to the new cluster and decommission the old cluster
There is a downside here – the process doesn't scale at all. While reindexing could be a valid option if there are only a few indices in the cluster, it poses a tedious task if there are dozens or thousands of indices involved. If even a single API call fails, the process has to be started all over again.
Move Data and Master Nodes between Clusters
Since the data is already located in an existing ElasticSearch cluster, the new nodes with RPD can be added, prior to replicating the shards for all data nodes (new and old). Also, the master nodes can be added to the existing cluster in order to get both the existing cluster and indices configuration, using this method:
- Create a new ElasticSearch cluster using RPD as StorageClass
- Move data and master nodes from the new ElasticSearch cluster to the old ElasticSearch cluster
- Modify the auto-expand replicas setting for all indices to 0-all and wait until all shards are allocated in all nodes
- Stop index services to keep data unmodified during the process
- Move all the data and the master nodes you just created from the old ElasticSearch cluster to the new one
- Once all the nodes have been restarted and are running successfully, point all the services to the new cluster and decommission the old cluster
Although this option may seem longer than the previous one, there is a significant upside: the data migration will be managed by the ElasticSearch cluster. The benefit? There is no risk of data loss and the copy will be completed much faster.
The Solution
After testing all the aforementioned options, moving data nodes and master nodes between clusters is our solution of choice. Why? Well, when we take into account the speed, size, and safety, the last method gives us the most peace of mind.
During the months-long testing process, other tasks requiring migration from Portworx to RPD arose. Up until then, our go-to GitOps solution was Spinnaker, but the customer decided to move their workloads to Harness. So, just by adding a few steps, we were able to come up with the winning option.
Apart from that, Kustomize was the tool that had been used to create the Kubernetes manifests to be applied in the cluster. But, following best practices and in an effort to improve workloads for our client, we opted to make the switch to Helm.
To deploy the new ElasticSearch cluster, we used this Helm Chart that contains two different subcharts: deployment and StatefulSet. The client nodes use the deployment subchart, while the index, master, and data nodes use the StatefulSet subchart because they are using persistent storage for configuration and cluster data.
In the end, three major changes were made:
- Portworx → RPD
- Spinnaker → Harness
- Kustomize → Helm
The Steps
A detailed plan for the migration was tested several times in local with a Kind cluster. Once the steps were reproduced in local at least three times, the process was performed in the customer’s test environment, as follows:
1. Install a new ElasticSearch cluster using the Helm Chart mentioned previously. It's important to set the ingress as false for the client nodes, as the current ElasticSearch cluster that is running contains an ingress. Also important to note is that the name for the manifests should be different, to avoid overlap. Change fullnameOverride in the values.yaml to a different name, to satisfy this condition.
2. Once the cluster is up and running, check that all nodes have been allocated. Cerebro is a great application that does exactly that from a single UI view.
3. Edit the new ElasticSearch data ConfigMap to point to the old cluster. Modify the clusterName and the master-discovery service name. After making those changes, restart the data StatefulSet to apply them.
kubectl edit configmap elasticsearch-data -o yaml
kubectl rollout restart sts elasticsearch-data
4. Modify the index.auto_expand_replicas setting for all indices to 0-all. This will create a shard on all data nodes, so that each index is divided into all data nodes By doing so, in the event that any data node is unavailable for a period of time, the time to recover said node will be shorter. Be sure to wait until all shards are allocated in all nodes.
apiVersion: v1
data:
  elastic-migration.sh: |
    #!/bin/bash
    indices=($(curl --silent "http://${1}:9200/_cat/indices" | cut -d ' ' -f3 | sort))
    for element in "${indices[@]}"
    do
      echo $2
      curl -X PUT "http://${1}:9200/${element}/_settings?pretty" -H 'Content-Type: application/json' -d "{\"index\" : {\"auto_expand_replicas\" : \"${2}\"}}"
    done
    if [[ $? -eq 0 ]]
    then
      echo "SUCCESS. All indexes updated."
    else
      echo "WARNING. Review indexes, something went wrong."
    fi
kind: ConfigMap
metadata:
name: elastic-migration-cmapiVersion: batch/v1
kind: Job
metadata:
name: elastic-migration-job
spec:
template:
metadata:
creationTimestamp: null
spec:
containers:
- command:
- bin/bash
- -c
- bash /etc/config/elastic-migration.sh elasticsearch 0-all
image: nginx
name: elastic-migration-container-job
volumeMounts:
- name: volume
mountPath: /etc/config
volumes:
- name: volume
configMap:
name: elastic-migration-cm
restartPolicy: Neverkubectl apply -f configmap.yaml && kubectl apply -f job.yaml5. Once you’ve done that, modify the _cluster/settings, changing max_bytes_per_sec to 800mb and allocation items to 16 (the values, by default, are 400mb and 4, respectively). In fact, it is possible to increase these values even more, but it all depends on the resources available in the data nodes. By changing both values, the data nodes will move data between old and new nodes faster. To modify them, a PUT call is needed. Use Cerebro or cURL to _cluster/settings endpoint in the ElasticSearch cluster with the following values:
{
"transient": {
    "cluster": {
      "routing": {
        "use_adaptive_replica_selection": "true",
        "allocation": {
          "node_concurrent_incoming_recoveries": "16",
          "cluster_concurrent_rebalance": "16",
          "node_concurrent_recoveries": "16",
          "node_concurrent_outgoing_recoveries": "16"
        }
      }
    },
    "discovery": {
      "zen": {
        "minimum_master_nodes": "3"
      }
    },
    "indices": {
      "recovery": {
        "max_bytes_per_sec": "800mb"
      }
    }
  }
}6. Edit the new ElasticSearch master ConfigMap to point to the old cluster. Modify the cluster name and the master-discovery service name. After those changes are made, restart the master StatefulSet to apply them. By moving the master nodes to the old cluster, the configuration is also migrated to the new cluster. This means that problems like spit-brain are avoided when switching nodes back to the new cluster.
kubectl edit configmap elasticsearch-master -o yaml
kubectl rollout restart sts elasticsearch-master
7. Alternatively, the masters can share the config by executing a cp. However, this option is slower than moving master nodes between clusters and is also riskier, due the fact that the copy could be interrupted by VPN or network issues.
mkdir elastic-data
kubectl cp NAMESPACE/OLD-MASTER-NODE:/usr/share/elasticsearch/data/nodes ./elastic-data
kubectl cp ./elastic-data NAMESPACE/NEW-MASTER-NODE:/usr/share/elasticsearch/data/nodes/8. Stop any index service to avoid data overwrites to the cluster during the rest of the process, otherwise the data may be corrupted or the new cluster could have different data than the old one.
9. Once master configuration is available in the new master nodes, move new master nodes to the new cluster, editing the new ElasticSearch master ConfigMap again.
kubectl edit configmap elasticsearch-master -o yaml
kubectl rollout restart sts elasticsearch-master10. Then, do the same thing for the new data nodes.
kubectl edit configmap elasticsearch-data -o yaml
kubectl rollout restart sts elasticsearch-data11. Verify that all data has successfully been allocated in the new cluster. The same indices and number of documents should be available in both. Use Cerebro to check those numbers or do so via an API call to ElasticSearch.
12. Point all the microservices to the new cluster. If the microservices need to access ElasticSearch through the ingress, is time to create the new ingress by setting the property to true in the Helm Chart. After that, confirm that all the microservices are pointing to the new cluster.
13. Restart the microservices that are indexing fresh data to ElasticSearch, pointing to the new ingress or via internal DNS within the Kubernetes cluster.
14. Finally, decommission the old cluster, removing all the manifests, PVCs and any resource associated with the cluster (tainted nodepools, GitOps configurations, etc.).
The Use Cases
The process is very useful for different changes at the infrastructure level, at the cluster level or for testing purposes.
- StorageClass change
- Downgrading or upgrading instance types
- ElasticSearch topology change
- Downgrading or upgrading disk sizes
The Conclusion
After performing this solution in several environments, including production, within four clusters in two different regions, there was no downtime and everything was done quickly and smoothly. To give you an idea, the biggest cluster is running more than 200GB of data and it took less than two hours to migrate that data between the nodes.
The good part is that the process can be divided into two maintenance windows: one to create the cluster and move master and data nodes to the old cluster; the other to move the new master and data nodes to the new cluster and decommission the old one. The wait time between these maintenance windows can be as long as desired, as there is no limit on the number of nodes running in the old cluster. Yes, you heard that right: the wait can be for days, weeks or even months!
This process guarantees a steady pace for the customer and keeps them happy, as there is no downtime involved. Plus, maintaining performance while reducing costs as a result of fewer instances and licences (removing Portworx in favor of RPD) is an added perk for the client, and additionally reduces their carbon footprint. You could say we're engineering Empathy for our customers and for the planet!
Ready to give it a try? You’ve got this!